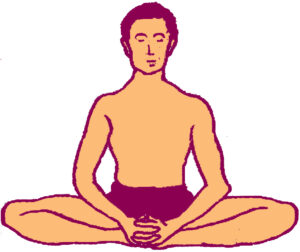
3.0 Introduction to Asana
Patanjali defines asana as “StiramSukamAsanam” which means asana (posture) is that which provides stability and happiness. In total there are believed to be around 8.4 million postures. In yoga, asana is a means to gain control over the body as it is necessary to have control over the body for moving to practices like pranayama, pratyahara, dharana, dhyana, and samadhi. Pranayama, the technique of gaining control over the breathing requires that a person stay in one place without any movement (in most cases a meditative posture), for a long period of time. This is only possible when one is physically and mentally strong. Thus different postures aim to tone different muscles of the body from different angles so that the body becomes supple and strong.
Asanas can be divided into six categories :
- Side bending postures.
- Forward bending postures.
- Backward bending postures.
- Twisting postures.
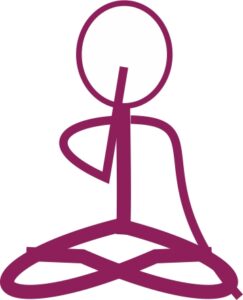
- Meditative postures.
- Topsy-turvy postures.
General Benefits of Asanas :
- Prevents muscle injury.
- Stretching by performing asana speeds up the healing process by improving blood circulation.
- Asana provide peace of mind as they have a direct influence over the autonomic nervous system.
- Helps to correct the imbalance in posture.
- Provides lightness to the body.
- Develops a feeling of well-being in an individual.
- Slimming and shaping the body.
- Develops concentration and memory power.
- Increases vitality.
- Provides relief from stress.
- Develops emotional balance.
- Develops the qualities of patience, courage, perseverance, determination and to know oneself better.
Asanas as preventive measures :
- Bones and joints become strong
- Circulation of blood becomes normal
- Immune system is strengthened
- Respiratory organs become efficient
- Enhancement in the efficiency of excretory system
- Muscles become strong
- Stress management
- Emotionally balanced
- Spiritual development
- Provide relaxation
- Reduces mental tension
- Improve concentration
Asanas as preventing common lifestyle diseases :
- Prevention of diseases.
- Corrects postural deformities.
- Maintain a healthy body weight and reduce obesity.
- Can help in managing blood sugar levels, hence prevent diabetes.
- Asanas help to regulate breathing and is a good curative method for Asthma.
- The blood circulation becomes normal by practicing asanas regularly. So asanas can help manage hypertension.
- Asanas help in managing back pain by increasing the flexibility in our body.
Principles of Performing Asanas (Postures) : Principles to be followed while performing asana are :
- Maintaining the posture in the final stage is very important.
- Perform the posture step by step. The most important thing while performing asana is the technique of moving to the final stage rather than the final stage.
- Awareness on breathing while performing asana.
- Do not make any jerking movements while performing the postures.
- Start the session with simple postures and move to complex ones.
- Work within your capacity.
- Do not rush through performing asana.
- Have food two to three hours before practicing asana.
- Wear loose clothing.
- Concentrate on oneself while performing asana.
Difference between yoga and exercise :
|
Yogasanas |
Exercise |
|
• Yoga is a discipline aimed at integrating a person’s physical, mental and spiritual fitness. |
• Exercise means any physical activity that stimulates the vital organs of the body, nourishes them and strengthens them. |
|
• When Yogasanas are performed, respiration and metabolic rates slow down. As a result, consumption of oxygen and body temperature drop. |
• When exercise is performed, breathing and metabolism speed up, oxygen consumption rises, and body gets hot. |
|
• Catabolism is prevented by yoga positions. |
• Exercise promotes catabolism. |
|
• Asanas are intended to affect certain glands and internal organs, as well as to modify electrochemical activity in the nervous system. The asanas are divided into three categories: beginner, intermediate, and advanced. |
• Exercise are intended to affect external organs and overall physical appearance. |
Yoga postures tend to arrest catabolism whereas exercise promotes it. Asanas are designed to have specific effects on the glands and internal organs, and to alter electrochemical activity in the nervous system. The asanas are classified in to three groups- beginners, intermediate, and advanced. Regular practice of a balanced programme, tailored to individual needs is recommended for maximum benefits.
3.1 Asanas to Prevent Obesity
Obesity : Obesity is a disease involving an excessive amount of body fat. It’s a medical problem that increases the risk of other diseases and health problems, such as heart disease, diabetes, high blood pressure and certain cancers.
Some people struggle to lose weight for a variety of reasons. Obesity often develops from a combination of dietary, physiological, and environmental variables along with exercise, physical activity, and lifestyle choices.
The good news is that even a little amount of weight loss can help or even stop the health issues linked to obesity. You can lose weight by changing your habits, increasing your physical activity, and eating better. Additional alternatives for managing obesity include prescription drugs and weight-loss techniques.
Causes of obesity : There are many reasons of obesity. Some of these are discussed below :
(i) Heredity : Gene is the unit of heredity. Thus a person whose parents are obese is more likely to be obese. It is usually seen that the person whose one parent is obese has 40% chances of being obese and if both the parents are obese, the chances become 90%.
(ii) Positive energy balance : Carbohydrates and fats are the energy fuel needed for the body. The major cause of obesity is that energy intake is far greater than energy output.
In other words, there is lack of energy expenditure and hence the obese person will continue to gain weight. The concept is known as positive energy balance.
Energy input Energy output.
(iii) Dietary habits : Another major cause of obesity is the eating habit
- There is strong relationship between an eating habit and overweight. Poor eating habits and unbalanced diet containing high portion of fat can result in an individual becoming tired and exhausted earlier than a person who is having balanced diet and higher portion of carbohydrates.
- When a person takes food rich in fat such as ghee, butter and vanaspati it results in excess calories in the body resulting in obesity.
- Overeating is another factor associated with obesity. When a person takes excess diet it may cause obesity. Carbohydrate is stored as glycogen. All the glycogen stored is converted into fatty acids and stored as fat in adipose tissues around major organs such as the heart and stomach, underneath the skin.
(iv) Hormonal disturbance : Some of the hormonal secretion released by endocrine glands also cause obesity like hormones secreted by pituitary gland and thyroid gland. It is due to hormonal disturbance that women become obese after pregnancy, adolescence and menopause.
(v) Lack of physical activity/exercise : There is a strong evidence that overweight children and adults are less active than the thinner people. Many people live a sedentary life with no energy expenditure. As a result they can not utilize the large amount of calories accumulated in their body and their weight begins to increase.
Preventive measure : Following are the ways to prevent obesity :
- Negative energy balance : One of the effective method of controlling the obesity is to shift the energy relationship so that energy output exceeds energy intake. This concept is known as negative energy balance and can be expressed as ENERGY OUTPUT > ENERGY INPUT.
- Balanced diet : Proper and balanced diet is one of the important way of losing weight. Poor diet with excess of oil and fat rich food, sweets often leads to obesity, lethargy, illness and vitality also decreases. The diet must be well balanced, i.e., containing all the nutrients for good health. Weight reduction is achieved only when the normal and required portion of fat, carbohydrate and proteins are maintained but amounts are reduced.
- Regular aerobic exercise : The long term effects of aerobic exercise in losing weight and obesity is well established. Regular and long term exercise increases energy output which results in fat reduction and improving metabolic rate.
- Playing games and sports : Games and sports are also good exercises, so by indulging in games and sports energy out put is increased which reduces fat.
- Avoid alcohol, smoking and drugs : Drinking, smoking and taking drugs are also the causes of obesity. So people should avoid them.
- Active lifestyle : Today people are lethargic and lead a cosy lifestyle which is the major reason of obesity. If people pursue an active lifestyle, they can avoid obesity, e.g., if the school or work place is near they should go on foot, one can use stairs instead of lift.
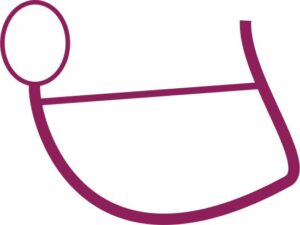
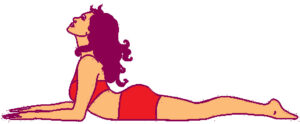
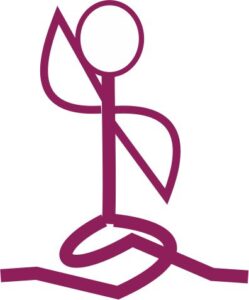
3.1.1 TADASANA
Tadasana final posture resembles a palm tree. Palm trees are often upright and straight. As a result, in this asana, one should be straight and erect.
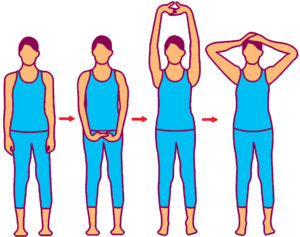
Method :
- To start, stand with feet together or about 10 cm apart and hands by the side of the thighs.
- Distribute weight evenly over both feet to maintain the body stable.
- Interlock fingers and raise the palms of the hands over the head.
- Place hands on top of the head.
- Fix the eyes at a position on the wall slightly above the height of the head, and keep them there throughout the asana.
- Inhale and raise the arms, shoulders, and chest.
- Raise heels and come up onto the toes.
- Stretch the entire body without losing the balance or moving the feet.9.
- Hold the breath and posture for a few seconds.
- Lower the heels while exhaling and raise the hands to the top of your head.
This is round one.
Breathing awareness : Breathing should be coordinated with arm raising and lowering, and balance should be maintained while stretching the entire body.
Things to keep in mind when doing this Asana :
- In order to maintain balance while doing this position, keep the eyes firmly locked on the spot.
- When getting back to the first position, carefully place the heels on the floor.
Benefits :
- Strengthens the leg muscle, ankle joint, arms and chest.
- Develops a sense of balance.
- Develops concentration.
- Helpful in increasing height
- Helpful in relieving pressure in between spinal bones.
- Children in the adolescent period should perform Tadasana immediately after shirshasana (headstand). If they don’t do so, it can affect their height.
- Stretches and opens the hips, groins, hamstrings, and calves; shoulders, chest, and spine.
- Increases mental and physical equilibrium.
- Helps improve digestion.
- Reduce anxiety, stress, back pain and sciatica.
Limitation : Avoid doing this asana if you are suffering from
- Those who have weak ankle joints should be careful while performing this posture.
- Migraine
- Diarrhea
- low or high blood pressure
- neck and back injuries
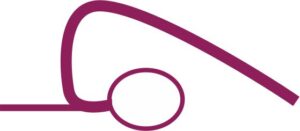
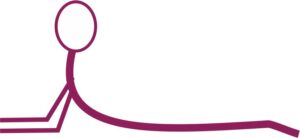
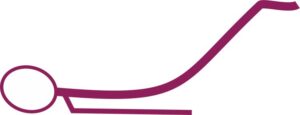
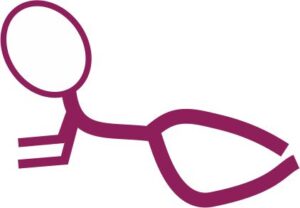
Important : ——————————————————————–
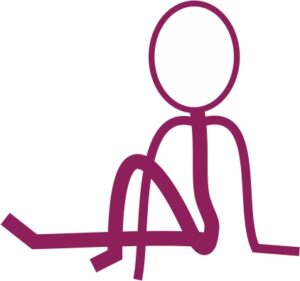
Stick Diagram represents the final position of an asana using simple lines or sticks.
——————————————————————–—————–
Stick Diagram :
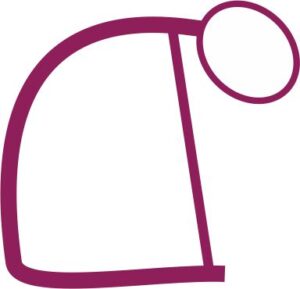
3.1.2 KATICHAKRASANA
This yoga pose is known by the names Kati, which means waist, and Chakra, which means circle. Literally means as “waist rotation,” katichakrasana. It stretches the waist and helps to make it more flexible and supple.
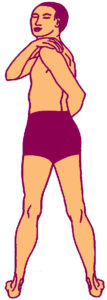
Method :
- Maintain a distance of 2-3 feet between your legs.
- Raise both arms to shoulder level, palms facing one another, and maintain their parallel position.
- While exhaling, rotate the body to the left such that the right palm meets the left shoulder, then inhale.
- While exhaling, rotate the body to the right such that the left hand touches the right shoulder, then inhale.
- This is one round; repeat it twice more.
- Lean back in Samasthiti.
Important Terms : ———————————————————–
Samasthiti : To stand straight in resting position.
———————————————————–————————–
Breathing awareness :
- Exhale, when turning to the posture.
- Inhale when come back to normal position
Benefits :
- Helps in keeping spine flexible and strong.
- Helps in releasing stress.
- Helps to give relief from Asthma.
- Loosens the hip.
- Helpful to give relief from constipation.
- Helpful in correcting scoliosis.
- Good for arm and leg muscles.
- Opens up the neck and shoulders and strengthens the abdominal muscles and lower back.
- Beneficial for those with sedentary or deskbound jobs.
Precautions :
- Do not practice Katichakrasana if you are pregnant, have a hernia, a sliding disc, or have just undergone abdominal surgery.
- If you have persistent spinal issues, see your doctor before performing this yoga stance.
Stick Diagram :
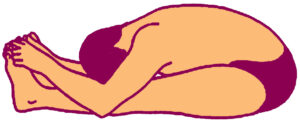
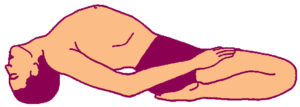
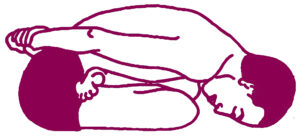
3.1.3 PAWANMUKTASANA
The name is derived from the Sanskrit words pawan (wind) and mukta (freedom). As a result, Pawanmuktasana is also known as the wind-removing asana.
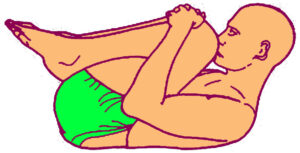
Method :
- Lie on your back with your legs straight.
- Now, bend your right knee and press it towards your abdomen with your hands. Exhale while raising your head and attempting to touch your chin to your knee.
- Take a deep breath in and straighten your legs.
- Then, using your left leg, push your abdomen.
- Place your chin between your knees and push your abdomen with both legs. Swing your body back and forth 5 to 10 times from this position, then left to right and vice versa 5 to 10 times.
Breathing awareness : Breathe regularly during the asana and be mindful of your movement coordination.
Benefits :
- Back and neck stretches.
- Internal organ efficiency is increased by stretching the abdominal muscles and compressing the internal organs, which also activates the nerves and improves blood circulation.
- Any trapped gases in the large intestine are released by the pressure on the abdomen.
- Digestive system becomes better.
- Provides constipation relief.
- Strengthens the lower back muscles and eases the spinal vertebrae.
- Reduces abdominal, thigh, and buttock fat.
- It benefits women with menstruation issues by applying pressure to the pelvic muscles and reproductive organs.
Precautions :
- As there is a lot of strain on the abdomen, it must be avoided if recent abdominal surgery has been performed.
- People with hernias or piles should avoid this asana.
- This pose is not recommended for pregnant mothers.
Stick Diagram :
3.1.4 MATSYASANA
The term “Matsya” in Sanskrit means “fish.” Matsyasana thus refers to the fish position. Matsyasana, according to ancient Yogic scriptures, helps restore spine strength and general body equilibrium, resulting in a more positive physical and emotional attitude.
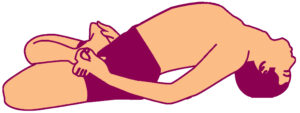
Technique :
- Start Matsyasana by resting in Savasana. Extend your arms and legs, relax the body, and take a few deep breaths.
- Place your palms beneath your hips, palms facing the ground. Bring the elbows up to your waist, positioning them close together.
- Cross your legs so that your feet meet in the middle and your thighs and knees are flat on the ground.
- Take a deep breath in and lift your chest up till your head is raised and your crown touches the ground.
- Ensure that the weight of your body is on your elbows rather than your head. Lift your chest and gently push your shoulder blades.
- Only maintain the posture for as long as it is comfortable. Take a normal breath.
- To finish Matsyasana, gently lift the head up, bring the hands back to the sides of the body, and descend the chest and head to the floor.
- Make sure the lower spine is near to the floor and the head is completely at rest. Take a few breaths while lying in Savasana. When you’re ready, return to the asana and hold it for a longer period of time, moving deeper into the asana with each exhalation.
Respiratory awareness
- Take slow, even breaths in and out, throwing your chest out as you exhale and lowering your head more.
- After taking a slow breath in, raise your head and relax your shoulders.
- As you exhale, extend your entire back to the floor, take a few breaths, and then relax your body.
Benefits :
- The neck and shoulder muscles are expanded and stretched during the matsyasana.
- It aids in opening the chest and correcting round shoulders.
- Increases deep breathing, which provides relief from respiratory conditions.
- Creates an arch, which strengthens the back muscles.
- Tone the parathyroid, pituitary, and pineal glands.
- This position aids in stress management and emotion control.
Contraindications/Precautions : People with certain medical conditions shouldn’t perform Matsyasana.
- A high or low blood pressure reading
- Injuries to the neck or to any area of the lower or middle back
- Migraine
- Spondylitis
- Heart conditions
- Pregnant women shouldn’t perform this yoga pose.
Stick diagram :

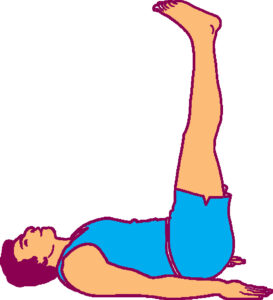
3.1.5 HALASANA
The word Hala signifies plough. This pose is called as Halasana because the ultimate position of the body resembles an Indian plough.
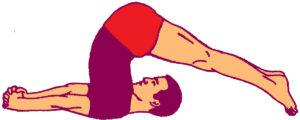
Method :
- Lie on your back with your hands by your sides and your palms resting on the ground.
- Pressing your hands together, slowly elevate your legs at a 30 degree angle without bending at the knees.
- After a little while, elevate your legs even higher, up to a 60-degree angle, and hold the posture.
- Now progressively incline the legs to a 90-degree angle.
- Using both hands, carefully move the legs towards the head.
- Continue bending your legs until your toes touch the ground, then stretch your legs back as far as you can.
- Next, make a finger lock by placing both hands. Put the elbows down on the floor.
- Before returning to the original position, first release the finger lock. Straighten the hands and place them by the side of the body on the ground.
- Gently lower the waist to the ground and slowly rise the legs off the ground, bringing the legs to a 90-degree angle as you go to the starting position.
Respiratory awareness :
- Maintain control over your breath and make sure it is regular and steady.
- Inhale deeply and elevate your legs to 90 degrees before exhaling completely.
- Hold yourself in this posture for a few breaths to enable the blood to circulate.
Benefits :
- Dyspepsia or constipation can be treated by practising this asana
- Beneficial for some types of diabetes.
- When Bhujangasana is performed just after Halasana, Halsana’s maximum benefits can be obtained.
Contraindication :
- Those suffering from cervical spondylitis or spine stiffness.
- A person with abdominal injuries or a hernia.
Stick diagram :
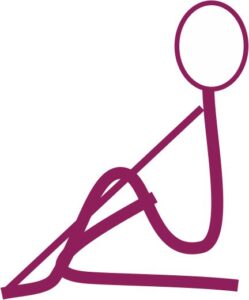
3.1.6 PASCHIMOTTANASANA
The Sanskrit terms paschima, which refers to the west or back of the body, and uttana, which means intense stretch or extended, are combined to form the phrase paschimottasana. One must sit in this pose and intensely stretch their back forward.
Procedure :
- Sit with your legs in front of you and your hands by your sides with your palms resting on the floor.
- Relax your back muscles and bend your body as far forward as you can.
- Remain in this position while letting your hands hang loosely where they are most comfortable.
- Continue bending forward a little more, and then place the forehead on the knees while holding the big toes with the respective hands
- After a few seconds, raise your head and return to your starting posture.
Respiratory awareness :
- When in the final position, breathe slowly and deeply
- while resuming the original position, breathe in
Benefits :
- It stretches the muscles of the back from the head to the ankles and contracts the muscles of the interior of the body.
- Enhances the respiratory process and the internal glandular processes, particularly the secretory processes.
- Enhances flexibility in the hips, thighs, and lumbar area.
- Massages and tones the whole abdomen and pelvis
- Balances the liver, pancreas, kidneys, adrenal glands, spleen, and intestines.
- Stimulates the spinal nerves and improves blood circulation in the back area.
- Enhances vertebral column alignment
Contraindications : People suffering from :
- Painful or swollen liver or spleen
- herniated discs
- acute appendicitis
Stick Diagram :

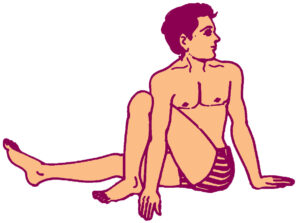
3.1.7 ARDHA MATSYENDRASANA
The name is derived from the Sanskrit terms ardha, which means half, matsya, which means fish, and eendra, which means king. This asana’s name, “ardhamatsyendrasana,” comes from the fact that its final pose resembles the half-Lord of the Fish. “Half Spinal Twist Pose” is another name for this asana.
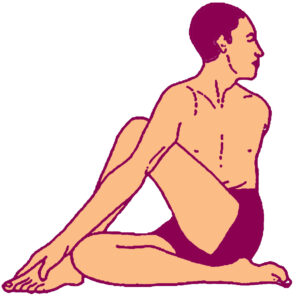
Technique :
- Sit extending both the legs together in front, hands by the side, palm resting on the ground. Fingers should be kept together and facing front.
- Fold the right leg at the knee and carefully place the right heel at the lower abdomen.
- Next, fold the left leg up from just above the right knee and rest it on the ground to the side. The left knee should face the sky.
- Move your right hand on the left side of your left knee. The left knee should be positioned to the left of the right armpit.
- Straighten the right hand now and grip the left toe or ankle.
- Twist your body to the left side and look backwards. Place your left hand on your right thigh, bringing it from behind you.
- While liftingthe hand from the thigh and tilting your head forward, go back to your starting posture.
- After releasing the right hand, straighten the left leg and then straighten the right leg, returning the back to its usual posture.
- Repeat it similarly from the other side by folding the left leg first.
Breathing awareness :
- Inhale in forward position.
- Exhale while rotating the body. In the final position, breathe gently and deeply without straining.
- Inhale while returning to the beginning position.
Contraindications :
- Pregnant and menstruating women should avoid it.
- This asana should not be performed by anybody who has undergone heart, stomach, or brain surgery.
- People with hernias or peptic ulcers should exercise caution.
- People with serious spinal conditions should abstain from the pose. While people with a minor case of a slipped disc might benefit from this pose, it should be avoided in more serious situations.
Stick Diagram :
3.1.8 DHANURASANA
The Sanskrit term Dhanura, which means bow, is where the name Dhanurasana originates. Dhanurasana is the name of the final pose of this asana, which resembles a bow.

Technique :
- Lie on your back with your knees together, hands by your sides, and your chin resting on the ground.
- Bring both legs to the thighs by folding them at the knee.
- Bring your hands backward and, using the thumb and fingers of your corresponding hands, hold the toes of each leg.
- Lift your head and chest as you lift your legs a little higher.
- Bring the toes up to your ear while holding onto your toes. Look forward.
- As you go back to its first position, relax your hands, bring your legs back until they touch the floor and then return your hands and legs to the original position.
Respertory awareness : Inhale deeply in the starting position. Retain breath inside while coming into the final position; Breathe slowly and deeply. Exhale while returning to the starting position.
Benefits :
- It eliminates neurological weakness and makes the muscles in the back and spine flexible.
- It eliminates extra fat and treats constipation.
- Dyspepsia, rheumatism, and digestive issues can all be cured with it.
- It improves appetite and digestion.
Contraindications :
- It is not advised to perform Dhanurasana if you have had abdominal surgery, high blood pressure, back pain, a hernia, headache, or migraine.
- Women should avoid doing this asana when they are pregnant or menstruating.
Stick Diagram :
3.1.9 USHTRASANA
Ushtrasana refers to the camel pose.
Ushtrasana, a backbend yoga pose of moderate difficulty, is renowned for opening the fourth chakra, known as Anahata or the Heart chakra. This yoga pose helps to increase the body’s flexibility and strength while also enhancing digestion.
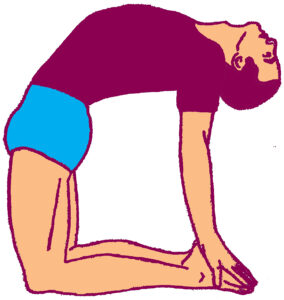
Technique :
- Start with Vajrasana.
- Stand on your knees and lift your arms to shoulder level beside your body. Keep the knees and feet together.
- As you exhale, turn to the right and lay your right palm on your right heel.
- Bending slightly to the back, touch the left heel with your left palm.
- In the last posture, bend the head and spine backward in keeping with your flexibility while pushing your abdomen and hips forward, keeping your thighs perpendicular to the ground.
- When in the final posture, make an effort to relax your entire body, especially your back muscles.
- The legs and arms should equally support the body’s weight. The arms should anchor the shoulders to maintain the arch of the back.
- After exhaling, straighten your thighs and abdomen.
- Take a deep breath in and slowly lift your left hand off your heels to go back to standing poition. Bring the left arm up to shoulder height before bringing the right arm up to shoulder height.
- After exhaling, lower your arms and return to vajrasana.
Respiratory awareness :
- Slow inhalation and exhalation during this asana.
- Every time you breathe in lift your chest upward. When you exhale, let your body relax.
- Inhale and release the neck first, then gently return to the starting posture and exhale completely.
Benefits :
- It encourages posterior muscular contraction and front body muscle stretching.
- favourable effects on the thyroid, ovaries, and other endocrine glands.
- Increases strength and confidence.
- beneficial for the reproductive and digestive systems.
- It relieves back pain, a rounded back, and drooping shoulders by releasing the vertebra and stimulating the spinal nerves.
- People with asthma benefit from it.
Contraindication : Avoid this asana in case of
- hernia
- abdominal injuries
- back problems
- severe arthritis
- vertigo
- pregnancy
Stick Diagram :
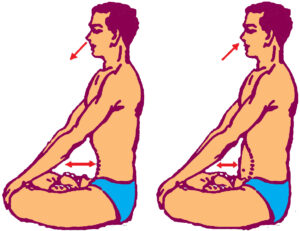
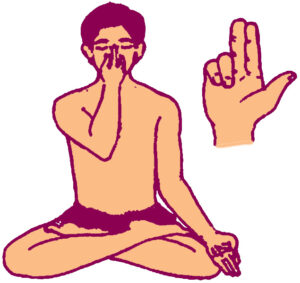
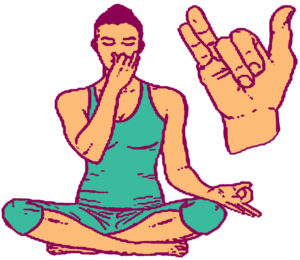
3.1.10 SURYA BHEDHANA PRANAYAMA
Surya Bhedana is a warming pranayamafocused on one nostril: the right. Surya, or sun, refers to the right nostril of the nose, which is connected to the Pingala nadi of the body. Bhedana means to pierce or pass through. By closing one nostril and forcing prana to pass through just one side, a warming affect is achieved on the body – appropriate for correcting an imbalanced coolness, which is more common during the cooler Vata and Kapha seasons.The right nostril is used for all inhalations during Surya bhedhana Pranayama and left nostril is used for all exhalations.
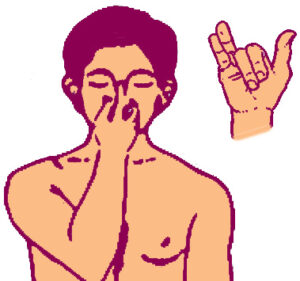
Method/Procedure :
- Start with meditation position, such as Padasana or Sukhasana and eyes closed.
- Use the right hand’s middle and ring fingers to keep the left nostril closed.
- As long as it’s comfortable, slowly inhale via your right nostril without making any noise.
- Next, lower your hand to the floor and lay it on your knees. To keep your breath, firmly press your chin into your chest. Contract your rectus muscles at the same time.
- After closing the right nostril and releasing the rectum muscles (anal lock), chest from the chin lock, very gently and silently exhale via the left nostril.
- Relax and return to your starting posture. Repeat 3-5 times.
Note : You will need to gradually lengthen the time you hold your breath. This is the extent of Surya Bhedhana Pranayama’s practise.
Benefits :
- This Pranayama should be practised regularly since it cleanses the brain, eliminates intestinal worms, and cures ailments brought on by an excess of wind (Vayu).
- It helps to manage rhinitis and various sorts of neuralgia.
- The worms that are found in the frontal sinuses are removed.
- It is beneficial for those with low blood pressure.
Contraindications :
- In case of any shoulder, wrist , fingers and hand injuries and surgery avoid this asana.
- Avoid this asana If there is acidityin stomach and mouth due to the heat created by it.
3.2 Asanas to Prevent Diabetes Mellitus
3.2.1 KATICHAKRASANA
(See 3.1.2)
3.2.2 PAVANMUKTASANA
(See 3.1.3)
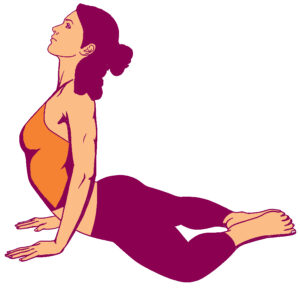
3.2.3 BHUJANGASANA
The term “Bhujanga” means “cobra” in Sanskrit. This asana is known as Bhujangasana because its final position resembles the “Hooded Snake.”
Procedure/Method :
- Lay down facing toward the ground with your legs together, toes pointing outward, hands by your sides, fingers joined, palms facing up, and forehead resting on the ground.
- Fold hands at the elbows, placing palms on the ground close to each side of the shoulders, and position the thumb under the armpit.
- Bring chin forward and place it on the ground. Look forward.
- Raise chin and lean head as far backward as possible. Turn the spine backwards up to the navel while raising the thorax. Never lift your navel.
- Hold the position for a while. Then gently lower your body back to the ground, placing the upper part of your navel, your thorax, your shoulder, your chin, and finally your forehead.
- Put your hands on either side of your thighs while they are still and relaxed.
Respiratory awareness :
- Breathe in while lifting your torso.
- Take a regular breath in the last position.
- Breathe out as you lower your torso.
- Movement and breathing should be synchronous and smooth.
Benefits :
- improves the flexibility and strength of the vertebral column and spine.
- opens the ribcage, heart, shoulders, and chest.
- the entire spinal extensor group of back muscles is toned and strengthened.
- stimulates the digestive system and endocrine system.
- Effective in case of kyphosis
Contraindications :
- Pregnant women should avoid this pose.
- Avoid the asana if suffering from Spondylitis.
- Those who have spinal cord damage or weak back muscles should avoid this pose.
Stick Diagram :
3.2.4 SHALBHASANA
The Sanskrit word shalabh, which signifies a grasshopper or locust, is where the name Shalabhasana originates.
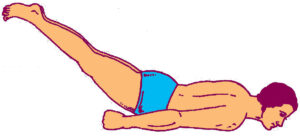
Techniques :
- Lay on the back with legs together, sole towards the sky, and toes facing backward. Palms facing up, fingers interlocked, and forehead in contact with the ground.
- Bring both hands under the shoulder like in Bhujangasana, folding them at the elbows. The fingers should be pointed forward.
- Maintain the position by slowly raising both legs without bending them at the knees.
- Gently lower the legs and return to the starting position.
Respiratory awareness :
- In the beginning posture, take a long breath.
- Retain breath inside while raising both legs and hold the position.
- Exhale while lowering the legs.
- Maintain this breathing and movement coordination.
Benefits :
- It helps to reduce the abdominal fat and tones the abdomen.
- It strengthens back and neck muscles.
- It helps in repairing your entire spinal cord and replenishes it.
- It helps to rectify your neck pain, and repair defects in the neck joints.
- It encourages digestion by improving activity of the intestines by stretching them.
- It helps in rectifying urinary disorders.
- It strengthens the uterus and reproductive system.
- It helps in correcting the menstrual problems.
- It strengthens the hip bones and reduces any excessive thigh muscles.
- It helps to decrease constipation.
Contraindications :
- People suffering with sliding disc or severe back discomfort should avoid this pose.
- People suffering from severe sciatica should avoid this asana since it tightens the entire body from the hips to the feet.
- People with severe menstrual irregularities or prolapsed uteruses should avoid this pose.
- Pregnant women should avoid this pose.
- This pose should be avoided by anyone with blood pressure problems as it might result in suffocation.
Stick Diagram :
3.2.5 DHANURASANA
(See 3.1.8)
3.2.6 SUPTA-VAJRASANA
In Sanskrit, supta means reclined, and Vajra means thunderbolt. This is mainly useful in improving the digestive system and boosting our stamina.
Procedure :
- Start with Vajrasana.
- Slowly bring your elbows near your hips on the floor.
- Slowly straighten your hands and rest flat on your back.
- Knees should stay together and shoulders should rest on the floor.
- After learning this position, put both hands under the shoulders in the shape of a scissor. The head should be in the centre, with the left hand under the right shoulder and the right hand under the left.
- Take out your hands and put them by your sides while returning to the original position.
- Sit now in the first position with the help of your elbow.
Respiratory awareness :
- In the last posture, take slow and deep breaths.
- Breathe in the opposite order as you return to the first position.
Benefits :
- It improves digestive problems and constipation by massaging the abdominal organs.
- It realigns rounded shoulders, strengthens the back muscles, and tones the spinal nerves.
- increases the amount of oxygen entering the body and helps to fully fill the lungs.
- People with bronchitis, asthma, and other lung conditions can benefit from it.
- It improves blood flow to the brain.
- It regulates the functioning of the adrenal glands.
- It tones the pelvic muscles.
- It helps in the improvement of both male and female reproductive organ diseases.
Contraindications :
- Should not practice in case suffering from very high blood pressure, slipped disc.
- Those who suffer from vertigo should avoid the asana.
- Pregnant women
- those undergoing irregularities in menstruation cycle
- having knee injuries or surgery, should avoid.
Stick Diagram :

3.2.7 PASCHIMOTTANASANA
(See 3.2.6)
3.2.8 ARDHA MATSYENDRASANA
(See 3.2.7)
3.2.9 MANDUKASANA
Manduk, which in Sanskrit means frog, is where the name Mandukasana originates. When you perform this yoga stance, your body will resemble a frog, therefore the term “frog pose.” This yoga pose is simple to perform and suitable for almost all age groups.
Technique :
- Sit in Vajrasana and make fists with both hands, the thumbs inside.
- Place your fists on your belly next to the belly button.
- Bend forward with exhalation.
- Keep looking straight.
- Hold your breath in the yoga posture for a few seconds and come up with inhalation.
- Repeat this asana 3-4 times.
Breath awareness :
- Inhale deeply.
- Once your forehead touches the floor, gently and fully exhale.
- Slowly exhale as you get to the first position.
- Come back completely exhaling and sit in Vajrasana again.
Benefits :
- This asana is beneficial to all organs of the body.
- Diabetes, gastrointestinal issues, and constipation can all be relieved with the mandukasana.
- The flexibility and mobility of the knee and ankle joints are enhanced by this asana.
- It helps tone muscles of the shoulder and abdomen.
- Your lung capacity will grow with consistent practise of this asana.
- People with heart and pancreatic issues might benefit from this yoga pose.
- This asana helps reduce fat from thighs, belly and hips.
Contraindications :
- People suffering from severe back pain must avoid practising this yoga asana.
- If you have recently undergone abdominal surgery, abstain from attempting to perform Mandukasana.
- Pregnant women are not advised this yoga technique.
- If you have injured your ankle, have high blood pressure, suffer from insomnia, or are prone to migraines, you should not practise this yoga asana.
Stick diagram :
3.2.10 GOMUKHASANA
The Sanskrit words Go, which means cow, and Mukha, which means face or mouth, combine to form the term Gomukhasana.This yoga asana gets its name because the thighs and calves of the person performing it resemble a cow’s face, wide at one end and tapering towards the other.
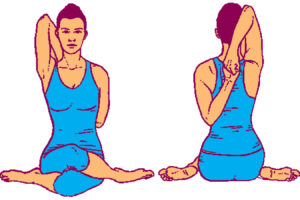
Procedure :
- Sit on the floor, with legs extended and spine straight.
- Place the palms on the floor and bring the left leg bent at the knee and place the left foot below the right hip, raising the body a bit. Sit on the left foot taking the ankle and the toes deep inside.
- Raise the right leg bent at the knee and place the right thigh over the left thigh by bringing the right foot close to the left hip on the floor.
- Bring your left arm and stretch it above your shoulder and head. Bending it, take the left palm and place it on your back, close to the shoulder blade.
- Raise your right arm now, take it behind you from below, bend it at the elbow, and attempt to reach for the left palm with your right hand. When you’re ready, grip your left palm and hold the posture while feeling the strain in your shoulders and elbows.6. Gradually, pull the palms closer and bring the chest out raising the upper body upwards. Ensure the neck does not bend forward, but remains in line with the shoulders and chest.
- Feel the stretch at the thighs, knees, chest, abdomen, shoulders, arms, neck and the elbows.
- Maintain this position for a few breaths and slowly release. Relax by stretching the legs out in front of you and bring the arms down beside you.
- After taking a few breaths in the relaxed position, bring the right leg bent at the knee and place the right foot close to the left hip and cross the left thigh over the right thigh and bring the left foot close to the right hip on the floor.
- Raise the right arm and bring the right palm from up and behind your head and place it close to the shoulder blade behind you.
- Stretch the left arm and take it from down and place the left palm close to the shoulder blade behind you and try to clasp the right palm. Interlock the fingers and pull the chest out and the shoulder blades closer expanding the spine upwards.
- Remain in this posture for a few breaths, then release the arms and stretch the leg out in front of you and relax.
Breath Awareness :
- In Gomukhasana, inhale and cross the legs taking the feet deep into the asana completely exhale expanding the spine
- Inhale again and bring the arms behind you
- Exhale taking the other arm from below holding on to the palms.
- With every exhalation stretch deeper into the asana and loosen the body with inhalation.
Benefits :
- The stretch at the hamstrings helps in gaining flexibility
- Gomukhasana enables greater flexibility of the hip joint.
- It stretches and tones the muscles of the chest.
- This asana increases blood supply to the legs and arms.
- The flexion of the knee joint can be useful to heal certain kinds of weakness in the knees (provided there is no ligament tear).
- Improves the functioning of the abdominal organs and digestion.
- Stretching the abdominal area also burns the unnecessary fat at the tummy area and tones the entire torso.
- Biceps and triceps muscles are strengthened and there’s increased flexibility of the shoulder and the upper arms.
Contraindications :
- Gomukhasana should not be practised by those suffering from shoulder pain, back ache, hip or knee pain or stiffness in the shoulders.
- This asana must be avoided when pregnant.
Stick Diagram :
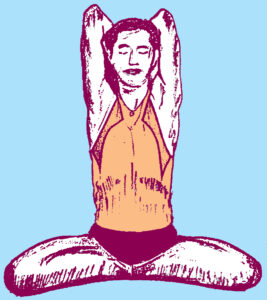
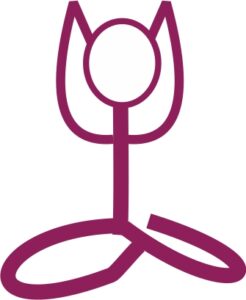
3.2.11 YOGAMUDRA
Yogamudra is a mudra, not an asana, although it can be used to treat diabetes.Yogamudra recreates the human form in its role of being a part of the Divine.It is the sign of great understanding and wisdom which knows the weakness of human nature and has endless potentiality.
Procedure :
- Take a padmasana position and keep your eyes closed.
- Hold one wrist behind the back with the other hand.
- Inhale deeply
- While exhaling, bend forward, keep the spine straight.
- Lower your forehead to the ground.
- Stay in that final position for as long as it is comfortable.
- Slowly return to the first position.
Breathing awareness :
- Inhale slowly and deeply in the first position.
- Exhale while bending forward. Breathe deeply and slowly in the last position.
- Inhale while returning to the first position.
Benefits :
- It helps to stretch the posterior muscles of the trunk and the neck.
- Enhances spinal column venous circulation and muscular toning.
Contraindications :
- Should be avoided during pregnancy.
- People who have undergone heart, abdominal or brain surgeries should not practice this asana.
- Care should be taken by those suffering from peptic ulcer or hernia.
- Those with severe spinal problems should avoid asana. While the asana can benefit those with mild slipped disc, but in severe cases it should be avoided.
Stick Diagram :
3.2.12 USHTRASANA
(See 3.2.9)
3.2.13 KAPALABHATI
This requires rapid and powerful diaphragmatic breathing. In a comfortable sitting position, one exhales forcefully by contracting the abdomen and inhales. The abdominal motions that occur in rapid succession for a certain number of times depending on one’s ability accompany the exhalations and inhalations.
Benefits :
- This is a great cleanser for the respiratory passages including the sinuses.
- It improves respiratory function and promotes circulation.
- Improves balance.
- It removes acidity and gas related problems.
- It cures sinusitus, asthma, and hair loss.
Precautions : People who should avoid this asana–
- Pregnant women
- slipped disc patients
- asthma patients should avoid it.
- It should not be performed during menstruation.
3.3 Asanas to Prevent Bronchial Asthma
Asthama : Asthma is a disease associated with respiratory tracks (air ways in the lungs)
Symptoms : Excessive amount of mucus, coughing, heavy breathing, wheezing or whistling, shortness of breath, swelling of air ways, chest tightness, fatigue.
Causes of asthma :
- Allergy
- Heredity
- Occupational Asthma (caused by inhaling fumes, gases, dust or other potentially harmful substances in work place)
- Cigarette smoking/passive smoking and polluted air
- Exposure to animals that cause allergy (pets)
Asanas recommended : Sukhasan — Chakrasan — Gomukhasan — Parvatasan — Bhujangasan — Paschimottanasana — Matsyaasan
(write procedure, benefit and contradictions of any 2 asanas)
Three methods to prevent asthma :
(a) To make your nearby area clean : Keep your home and work place clean, use of mask while cleaning.
(b) Avoid dust : Minimize the dust in your home and working area, remove carpet and install wood work which can reduce the dust.
(c) Air conditioners to be used : The air flow areas are to be closed (windows) of home and this reduces the entry of air borne pollens that can cause asthma. Asthma also be managed by following ways :
- Keep off obesity
- Regular exercise
- Eat plenty of water and vegetables
- Control acidity
3.3.1 TADASANA
(See 3.1.1)
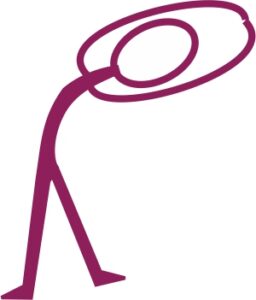
3.3.2 URDHVAHASTOTTANASANA
This asana’s name is taken from the Sanskrit words urdhva, which means upward, and hasta, which means hands. In English, urdhvahastasana is known as the upward salute or upward hands position.
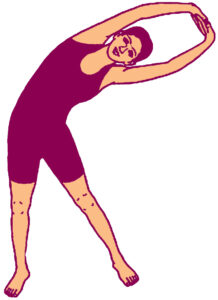
Procedure :
- With your fingers locked, raise your arms upward while standing straight.
- Breathe in and stretch your hands upwards while keeping your feet flat on the floor.
- Bend slowly left or right while exhaling and maintain the position for few seconds.
- Slowly bend to the opposite side (left/right), breath out and exhale
- Inhale as you gently stand up.
Respiratory awareness
- Inhale when stretching up.
- Exhale out when side stretch and return position.
Benefits :
- Back pain : It stretches the muscles, particularly the finer back muscles. This yoga pose may be used often to relieve back discomfort.
- Spinal health : It is advantageous for spinal health. It helps to correct the curvature of the spine after concentrating on the alignment of the body and spine.
- Weight loss : It is known as yoga for waist slim, yoga to remove fat from hips due to adequate stretch in this region.
- Asthma control : It provides stretch to the chest region, thus, helps to increase the intake capacity of the lungs. All these ensure the betterment of lung health and gives relief from asthma too.
- Constipation relief : It ensures proper movement to the alimentary canal, especially the stomach, intestine, and large intestines, which result in relieving constipation.
- Abdominal sides’ fat : This is one of the best yoga poses to burn the fats from abdominal sides because of experiencing extra stretching in these areas.
- Nerve health : Practicing the yoga asana on regular basis will facilitate stretching from toes to fingers. If it is maintained with breathing, it can show its impact upon the efficiency of nerves.
- Strengthening of legs : The asana is good for the health of toes, feet, ankles, knees, buttocks, etc.
- Sciatica : If it is practiced under the supervision of a yoga expert, sciatica pain can be reduced drastically.
Contraindications :
- Pregnancy : The asana should be avoided during pregnancy.
- Varicose vein : A person suffering from varicose veins should takpractisee the help of a yoga expert.
- Headache : Don’t perform during headache.
- Insomnia : During insomnia, a yoga therapist should be consulted before practicing the yoga pose
Stick Diagram :
3.3.3 UTTANMANDUKASANA
Hold the head in the elbows while doing the Mandukasana. This pose, called Uttanaamandukasana, appears like an upright frog.
Procedure :
- Start with Vajrasana.
- Spread your knees apart, but keep your toes together.
- Place the palm of your right hand behind the left shoulder, folding it backward from above the right shoulder.
- Place the palm of the folded left hand in a similar manner on the right shoulder. Elbows should be touching one another.
- After returning to the starting position, carefully take the left hand away. Knees should be together in the initial posture.
Benefits : Uttanmandukasana is helful in —
- Diaphragmatic movements.
- Removes back pain and pain in lumbar region.
- Improving posture
- Increses elasticity of thigh joint and shoulder.
Contraindications : This asana should not be performed by anybody with arthritis, a hernia, chronic or severe back pain, elbow discomfort, shoulder pain, or spinal abnormalities.
Stick Diagram :
3.3.4 BHUJANGASANA
(See 3.2.3)
3.3.5 DHANURASANA
(See 3.1.8)
3.3.6 USHTRASANA
(See 3.1.9)
3.3.7 VAKRASANA
Vakra is the Sanskrit word for twist. Vakrasana, which translates to “twisted pose” from Sanskrit, is so named because doing this asana twists the spine. The class of sitting asanas includes Vakrasana. Vakrasana involves the neck, hips, lower back, and middle back.
Procedure :
- Seated in Dandasana, take a few breaths and expand the spine upwards. Connect the breath with the movement of the spine and relax the entire body.
- Bring the left knee close to your chest and take a few breaths, then pick up the left foot and place it outside of the right knee.
- Twist your upper body towards the left while the right elbow is placed at the outside of the left knee and place the hand on the floor close to your right knee. Remember the body is twisted to the same side as the knee is bent and, in this case, because the left knee is bent, the body is twisted to the left.
- Take a deep breath and, with the support of the right elbow, twist the upper body to the left as far as possible and face the wall behind you.
- Place the left hand behind you as close as possible to your lower back. This should help you raise your spine up and also to balance your body.
- With every exhalation raise the spine and twist as much as possible trying to turn your neck and shoulders to bring it parallel to the wall to your left.
- Release the asana and take a few breaths and relax in Dandasana.
- Continue the stretch with the same position of the left knee, but twist your body now to the right by placing both the palms on to the floor on the right close to your lower back and try to look behind you as much as possible.
- Repeat the same now with the right knee and start with turning to the right and then release. Continue the asana with the upper body twisted to the Left.
Respiratory Awareness :
- Inhale as you twist the body
- Exhale while coming back to the initial position.
- Repeat on either sides.
Benefits :
- This asana helps straighten the upper back.
- It strengthens the neck muscles.
- This asana tones the internal organs like the digestive system, intestines, uterus and kidneys.
- As this asana puts neck muscles to work, it activates thyroid gland. This ensures a balanced hormone level in the body.
Contraindications :
- It may not be a good idea to practice this yoga asana if there is a back injury.
- Pregnant women should avoid this yoga asana as it will bring discomfort to the uterus and hence this asana is not good for them.
- Persons suffering from weak neck muscles or upper spine may get sore neck muscles.
Stick Diagram :
3.3.8 KAPALBHATI
(See 3.2.13)
3.3.9 GOMUKHASANA
(See 3.2.10)
3.3.10 MATSYAASANA
(See 3.1.4)
3.3.11 ANULOM-VILOM
This is one of the fundamental types of Pranayams. Anuloma-viloma, which means “made in the opposite order,” is another name for this practise. The name of this technique comes from the fact that the nostrils are always used in reverse order for both inhalation and exhalation.
Procedure :
- Sit in a comfortable position for meditation. Maintain a straight spine and head. Close your eyes.
- Form the jnana mudra with the right hand. With your right thumb, squeeze the right nostril closed. Take five counts of breaths through your left nostril.
- Release the thumb pressure on the right nostril after five breaths, and use the ring finger to close the left nostril.
- Exhale for 10 counts via the right nostril while keeping your breathing slow, deep, and silent. Next, take five counts of breaths in via your right nostril.
- Exhale for 3 to 5 minutes or 5 practice rounds while making sure there is no sound made as the air passes through the nose.
Benefits :
- Improves attention and focus by calming and centering the mind. balances the right and left hemispheres.
- improves immune system.
- Treats hypertension.
- Provides enough oxygen for every cell in our body to operate properly.
- Eliminates waste products from the body, such as carbon dioxide and other poisonous gases, so they don’t stay in the bloodstream.
Stick Diagram :
3.4 Asanas to Prevent Hypertension
3.4.1 TADASANA
(See 3.1.1)
3.4.2 KATICHAKRASANA
(See 3.1.2)
3.4.3 UTTANPADASANA
The Sanskrit words uttana, which means to elevate upward, and pada, which means feet or legs, are used to define the asana. One of the most significant yoga poses, uttanpadasana has several health advantages. Also because legs are lifted in a supine posture, it is sometimes referred to as The Raised Leg Pose.
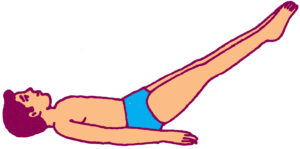
Procedure :
- Position yourself on your back with your knees together and your hands by your sides. palm laying on the surface.
- Slowly raise both legs to a 30-degree angle.
- After few seconds, lift furthur to a 45-degree angle.
- After a little while, lift it to a 60-degree angle and hold it there for a short while.
- While returning, stop at 45 degree or 30 degree angle.
- Bring both of your legs to the ground.
Benefits :
- This asana is very beneficial for those suffereing from diabetes, constipation, indigestion and nervous weakness.
- It balances the naval cetre “Nabhimanipurachakra”
- It builds up the abdominal muscles.
- Helps to improve breathing and lung capacity.
Contraindications :
- Avoid this posture in case there is any injury in the neck, back, pelvis, or leg muscles.
- Pregnant women should not perform this asana.
- People suffering from severe spondylitis, cardiac disease or abnormal blood pressure must refrain from uttanapadasana.
- If an individual has undergone hernia-repair surgery, wait at least two weeks before practicing this asana.
- If you have a migraine, then do not practice it.
Stick Diagram :
3.4.4 ARDHA-HALASANA
This pose is known as Ardha-halasana because the body, when in its final posture, has the shape of one-half of an Indian plough. Ardha means “half,” and Hala “plough,” hence the name of this pose comes from these two words.
Procedure :
- Take supine position, hands straight by the side of thighs and palm resting on the ground.
- Slowly raise your legs together without bending them at the knees and pressing your hands till you stop at an angle of 30°.
- After few seconds, raise your legs further towards your head up to an angle of 60° and hold position.
- Now slowly bring your legs up to an angle of 90° and maintain position for 15 -30 seconds.
Breathing awareness :
- Inhale while in the lying position. Retain breath inside while assuming the final asana.
- Breathe slowly and deeply in the final position. Retain breath inside while returning to the starting position.
- It is the preparatory asana for halasana.
Benefits :
- Improves digestion and appetite.
- Improves blood circulation.
- Strengthens the thigh and calf muscles.
- Helps to reduce abdomen fat and lose weight
- Stimulates the abdominal organs.
Contraindications :
- People suffering from any cardiac problems, back pain, high blood pressure should avoid this practice.
- Not to be practised by women who are pregnant, as the pressure is immense at the lower abdomen causing tightening around the pelvic area.
- Anyone suffering from acute lower back pain needs to take precaution during this practice.
- Anyone recovering from any kind of stomach infection or surgery around the abdominal area should take proper precautions and guidance
Stick Diagram :

3.4.5 SARALA MATYASANA
The word Saral means easy and Matsya means fish.
Procedure : Lie flat on the back.
- With the support of your hands keep the top of your head on the mat.
- Neck, upper back and shoulders will be lifted from the ground.
- Relax your hands at the side of your body.
- Breathe normally and keep your toes stretched out.
- Hold the position for 30 seconds, then relax.
Breath Awareness :
- Inhale as you lift the chest and tuck the head.
- Exhale while relaxing the body and bring it to the initial position.
- And get back to normal breathing.
Benefits :
- It improves digestive system.
- Helps to cure irritable bowel syndrome.
- Helps to get rid of abdominal-related issues
Contraindications : People with cervical spondylitis and frozen shoulder should avoid practicing this asana.
Stick Diagram :

3.4.6 GOMUKHASANA
(See 3.2.10)
3.4.7 UTTAN MANDUKASANA
(See 3.3.3)
3.4.8 VAKRASANA
(See 3.3.7)
3.4.9 BHUJANGASANA
(See 3.2.3)
3.4.10 MAKARASANA
Makar means crocodile. This pose is called Makarasana because when performing it, the body forms the shape of a crocodile. Like Shavasana, it is regarded as a relaxing asana.

Procedure :
- Lie on your stomach with your hands by your thighs.
- Slowly stretch both legs apart. The heels should turn in and the toes out.
- Slowly fold the left hand at elbow bringing it from below the armpit. Place it on the right shoulder. Fold the hand at the elbow and place it on the left shoulder.
- Position your head on the triangle formed by your elbows.
Respiratory Awareness :
- Inhale as you raise your torso.
- Exhale as you place your elbows on the floor.
- Inhale by raising the shoulders and expanding the chest.
- When you exhale, lift your chin up and push your belly into the ground. Inhale and feel your chest and belly expand.
- Inhale and exhale while you maintain this posture.
Benefits :
- This is beneficial in Asthma
- For those who have acquired wrong process of respiration this asana is quite useful.
- Abdominal muscles get automatic massage.
Contraindication : This asana should not be performed by those suffering from
- Heart problem
- Obesity
- Gas or high blood pressure
Stick Diagram :

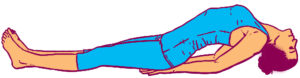
3.4.11 SHAVASANA
Shavasana involves falling flat on the ground like a corpse. Shavasana promotes mental rest and prevents tiredness. The goal of this posture is to promote relaxation. It is excellent for eliminating tiredness caused by doing other asanas.

Technique :
- Lie straight on your back with ease.
- Keep distance of about one and half feet between the legs.
- Place hands straight on the ground at the distance of six inches from your body, palms facing upward, fingers will remain slightly curled and eyes closed.
- After maintaining it for sometime, return to first position.
Benefits :
- This asana is practised soon after the practice of other asanas, through this fatigue is removed.
- This very beneficial in high blood pressure, and cardiac diseases.
- It is also beneficial for people suffering from neurosis and fear complexes.
Contraindications : Those who have been forbidden for supine position by doctors due to some reasons, should not practice it.
Stick Diagram :

3.4.12 NADI-SHODHANA PRANAYAM
It is regarded as a purification channel because Nadi means “channel” and Shodhana means “purification.” Alternate Nostril Breathing, or Nadi Shodhana, is another name for this technique.
Procedure :
- Take up a comfortable position for meditation. Maintain a straight spine and head. Close your eyes.
- Make jnana mudra with your right hand. With your right thumb, squeeze the right nostril closed. Take five counts of breaths through your left nostril.
- Release the thumb pressure on the right nostril after five breaths, and use the ring finger to seal the left nostril.
- Exhale for 10 counts via the right nostril while keeping your breathing slow, deep, and silent. Next, take five counts of breaths in via your right nostril.
- Exhale for 3 to 5 minutes or 5 practise rounds, being careful not to make any noise as the air travels through the nostrils.
Benefits :
- Calms and steadies the mind, improves focus and concentration. Balances left and right hemispheres.
- Strengthens the immune system.
- Manages hypertension.
- Provides sufficient oxygen for the functioning of every cell in our body.
- Removes waste products such as carbon dioxide and other toxic gases from the body, so that they do not remain in the blood stream.
3.4.13 SHEETALI PRANAYAMA
As the name indicates, this Pranayama cools the system. It helps to keep the body’s temperature down.
Procedure :
- Start by sitting in Padmasana or another comfortable position. Put your hands in the jnana mudra and place them on your knees. Gently close your eyes.
- With your mouth wide open, extend your tongue outside of it, and then bend the sides of it lengthwise to make a cylindrical shape before inhaling.
- The air should travel through the tongue when you inhale. Keep your mouth shut.
- Retain breath for as long as you can while pressing the chin against the chest (chin lock), simultaneously pulling your rectum muscles (anal lock).
- Then release chin lock and anal lock and exhale slowly through the nostrils.
Benefits :
- Beneficial in diseases pertaining to throat and spleen etc.
- Cures indigestion.
- Helps in controlling thirst and hunger. Lowers blood pressure.
- Beneficial for diseases caused by imbalance of pitta dosha (heat).
- Purifies blood.
Stick Diagram :

3.5 Asanas to Prevent Back Pain and Arthritis
3.5.1 TADASANA
(See 3.1.1)
3.5.2 URDHWAHASTOTTANSANA
(See 3.3.2)
3.5.3 ARDHA-CHAKRASANA
Ardha means “half” in Sanskrit, Chakra “wheel,” and Asana “position” Ardha-chakrasan, thus, refers to half-wheel positions. It is a simplified form of chakrasana.
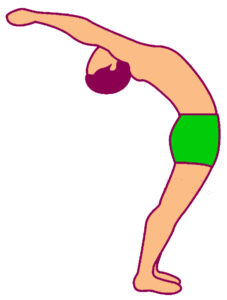
Procedure :
- Stand straight and bring your hands together in a clasped position.
- Raise your hands over your shoulders while rotating them.
- Slowly bend as much of your upper body as you can, including your hands.
- Depending on your ability, stay in this posture for a while.
- Return slowly to a standing posture with your hands on your sides to release the position.
- There is a variation of Ardha Chakrasana in which the backbend is done while holding the hands behind the hips.
Benefits :
- It makes the back and abdominal muscles stronger.
- Strengthens the digestive, excretory, and reproductive organs in the abdomen.
- Correction of posture defects and back issues.
- Strengthens the arm and shoulder muscles and opens the chest.
- The posture gets beginners ready for the more challenging complete wheel pose, or Chakrasana.
Contraindications :
- People with any type of spine, hip, or neck injury should not perform Ardha Chakrasana.
- This pose should be avoided by people with high blood pressure.
- Pregnant women should avoid this asana
Stick Diagram :
3.5.4 USHTRASANA
(See 3.2.12)
3.5.5 VAKRASANA
(See 3.4.8)
3.5.6 SARALA MATSYENDRASANA
(See 3.4.5)
3.5.7 BHUJANGASANA
(See 3.2.3)
3.5.8 GOMUKHASANA
(See 3.2.10)
3.5.9 BHADRASANA
Bhadrasana, which is made out of the terms “Bhadra” and “Asana,” meaning Gracious Yoga. In Sanskrit, the term “asana” denotes a yoga pose, whereas the word “bhadra” signifies auspicious or gracious.
Procedure :
- Sit on the mat with your legs completely straight in front of you.
- Bring the feet near to the generative organ with the toes facing outward and the heels very tightly contacting the perineum.
- If necessary, grasp the feet and tuck the heels as closely as possible against the torso.
- After maintaining this position, push the knees down with the hands on each one.
- Maintain a straight neck, a forward-facing upper body, a flat stomach, and eyes at one point straight ahead.
- Maintain this position for while then then get back to the starting position.
Benefits :
- Helps to loosen the joints by flexing and stretching the tendons. The muscles of the pelvis, knees and ankles become more supple.
- Relieves tension from the spinal region.
- Provides relief in cases of sciatic, varicose vein and menstrual disorders.
- Prevents Arthritis
- Improves posture
- Promotes concentration
- Bhadrasana is a good for those who find it difficult to sit in more classical posture like Padmasana and Vajrasana.
Contraindications : Although beneficial for prevention from arthritis, practitioners with serious arthritis should consult yoga expert before practising this asana.
Stick Diagram :
3.5.10 MAKARASANA
(See 3.4.10)
3.5.11 NADI-SHODHANA PRANAYAM
(See 3.4.12)